If you’ve bought a high D whistle, and find it a bit loud or shrill, there are other keys available. (The fact that I make whistles and flutes has nothing to do with the last statement). The larger the whistle, the deeper it is, and it usually follows that the holes will be larger and more widely spaced, which may make things a bit awkward for the complete newcomer.
The next thing you should be aware of, and probably the most important ingredient to learning the whistle, whether you are six or sixty, is that you will have to practice, AND do it with a good heart! Unless you are gifted, it’s just going to have to happen. If you are serious about learning, you doubtless knew that anyway, and if not, you would soon be frustrated by your slow rate of progress. We had to get that out of the way where I have never heard it seriously put before – right at the beginning! First of all, hold it (the whistle) in your hands and look at it. This little instrument is capable of wrenching the living soul out of listener and player alike. The purpose here is to administer an anaesthetic to the learning process. You do, or you don’t, read music? The whistle won’t care either way, and my belief is that you learn more with your ears anyway.
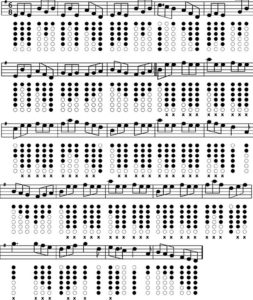
In an attempt to cover all the angles, several ways of writing music down have been employed here to ease your passage into tunes. What could possibly be confusing is that they appear together.
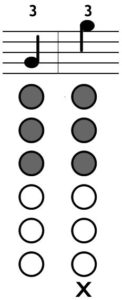
The illustration shows all three methods together for the note G.
Method 1: Musical notation, for those of you who paid attention at school.
Method 2: A number, written above the note. This shows the number of fingers covering holes, 1-6 from the top of the whistle down.
0 = No fingers 0/5 = Top finger off – the rest on 0/2 = Top finger off – next two on
Method 3: Six vertical holes representing a whistle: if a finger is meant to cover it the hole is shown darker.

Yes, that one, any one!
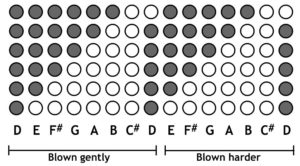
The very first time you blew into the whistle, the chances are that you discovered for yourself that the instrument is capable of 2 notes, each an octave apart, for every hole. The difference between them is a slight increase/decrease in breath pressure. Practice going up and down the whistle, playing first the low tone, then slightly increase the breath and get the higher tone, for each hole on the whistle. In time you will be able to ‘think’ the note you want and your lungs/diaphragm will miraculously deliver the one looked for. It’s a case of knowing your own instrument, as they all behave slightly differently. Don’t forget to breathe!
I think a Slow Air will be easier on the nerves to begin with. Success feeds success, and proudly playing a reasonably obscure air to your mates, and having their well deserved praise heaped upon you, will be assured!
Reason 1 – they will think your bum notes were part of the emotion of the tune, and,
Reason 2 – they probably won’t know it so can’t contradict you!
Siobhan ni Duibhir is such an air, and a very beautiful, yet simple one. Have a go at it!
Right, so you’ve had a couple of hesitant goes at playing an air.
If you were not happy with the results, I believe I can offer an explanation. My theory is that, after hearing a tune a couple of times, the brain can very well remember how to get from one note to the next. However, your fingers now take on a saboteur’s role and deliberately send the tune to hell! Why? Because the happy day when your fingers nimbly flick up and down in something like the right order hasn’t arrived yet. Why should they? They are probably being held in an unusual attitude, over tightly, being asked to perform a trick they never tried before. What cures it? Yes…you guessed it, regular practice! Whilst on the subject of speed (were we?), a common fault with many students, me included, is to equate good playing with fast playing. This can be true, of course, but it is best to avoid the temptation to let rip, at least to begin with. Fast playing can often be an illusion of confident fingering and good ORNAMENTATION which is the next thing we need to look at.
Simply put, ornaments , or those twiddly bits if you prefer, are what give colour, expression and a lift to the music. Even if you are not that confident with playing our Siobhan ni duibhir, it’s time to add some cuts to the tune.
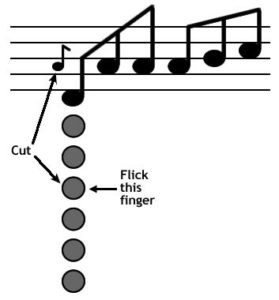
Go back to the music and look at the first note. Each has a little note hanging above it just to the left. This note is called a CUT. Notice that all similar notes in the tune have one!
With all six fingers in place ready to play the note, blow, and at the same time rapidly lift and replace your third finger only (just a flick). A couple of things just happened: it gave a good clear start to the note, and, you just played your first (deliberate) ornament!
Whilst we’re on a roll..!
At the very thought or mention of the word, a lot of folks make a sharp intake of breath and display the body language common to the dentist’s waiting room. Some tutors say ‘learn the tune first and add the ornaments later’.
My own personal experience would have preferred to learn ROLLING very early on, because the other way requires an amount of un-learning as well as learning. Get the hang of it now, and you will be able to apply that unmistakable brashness to your tunes, and give a real life to the music. I sincerely hope that the following explanation will be grasped without too much headscratching, and inspire you to explore other methods than the simple example given.

Play a note – let’s say E (5).
Now do a cut – flick the A (3) finger.
Do another – this time we’ll call it a TAP – on the note
below D (6) flick of the finger.
You should have played E, A, E, D, E (5,3,5,6,5)
Fingers 1,2,4 and 5 should not have moved. 3 and 6 did all the work.
Practice rolling slowly, getting separate clear notes.
Let’s go up a note – play F# (4).
Do a cut with A (3).
Do a tap on the note below E (5).
You should have played F#, A, F#, E, F# (4,2,4,5,4)
Fingers 1,2 and 4 did not move. Fingers 3 and 5 did all the work.
Using the given examples, work out rolls up and down the whistle. You will have to use your own ingenuity here and there. The general rule is the note, a note above, the note, a note below, the note again.
This has been but one method, hopefully it will whet your whistle to discover other variations. Talk to other musicians, listen to recordings. No doubt there are those amongst you who will be able to slip a slow roll or two into our air, Siobhan ni Duibhir. However, the time has arrived to step up a cog in tempo, to a tune with a set rhythm structure.
A Double Jig has a 6/8 rhythm, or put another way, 6 beats to a bar, or count 1-2-3-4-5-6, 1-2-3-4-5-6, 1-2-3-4-5-6, etc or diddaly, daddaly, diddaly, diddaly (count the syllables).
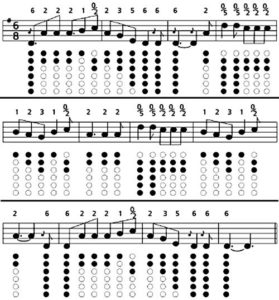
This was the first jig I learnt, way back in the early seventies. I bought an album by Breton Harpist Alan Stivell and worked it out on my flute. For that I thank him very much! I still never tire of hearing or playing it! It has an easy lilt, and sounds good played slowly. The way the tune is written down can really only be described as ‘the bare bones’, and is meant only to help you learn it, assuming you don’t know it already. Using one of the suggested methods (or one of your own) work your way along the dots with your finger and get the rhythm going in your head, or even better, do it our loud. Don’t try and work the tune out, just la-la-la or whatever the groups of six notes, and try to keep going to the end. Morrison’s Jig is on the next page.
A quick note about tune structure needs to be made here. Most Irish tunes, and this one is a good example, are made up as follows:It has two parts – we’ll call them ‘A’ and ‘B’. The tune starts by playing part ‘A’. That is, up to the two dots at the heavy line on the music. They mean repeat the bit before, so, play ‘A’ again. That’s the first half of the tune. Part ‘B’ begins after the dots and continues right to the end. There are no dots so it is not repeated.
Now you’ve played the tune – once! When you’ve more or less got the gist of how the rhythm and structure goes, point your whistle at it and give it a go. We’ll dispense with the numbers over the notes, I hope you’ve moved on from there!
Where can you put the ornaments? There are no hard and fast rules here, but some phrases lend themselves more than others. For example, you could, and I sometimes do, begin the tune with a roll. An E roll and it replaces the first three notes shown (5,6,5). The fact that you are replacing three notes with the five in the roll should tell you that some squeezing is going to have to take place to retain the timing. The two added grace notes happen so quickly that they don’t really have any time value at all in practice.
Generally, the tune will be played twice, and maybe three time over. There are variations to the ‘A’ and ‘B’ bit, but it doesn’t concern us here, so we won’t confuse the issue. Continuing with our keeping the process simple style, in part ‘A’ put an ‘E’ roll instead of:
A – The first three notes in bar 1
B – The first three notes in bar 3
C – The first three notes in bar 5 and a ‘G’ roll instead of:
D – the first three notes in bar 7
Part ‘B’ doesn’t offer the same possibilities or groups of notes, but stands well on its own I think. Except maybe a ‘G’ roll in the upper octave in second bar, last line. What can be added is some light and shade, that is, varying volume, tone and emphasis which will happen when your breath control practice kicks in, that’s what you’ve been doing it for!
Sliding a note is where you roll your finger off the hole rather than just lift it. This is usually used on the way up the notes, but can be done descending, particularly when playing slow Airs. The effect should be a gradual sliding change from one not to the next, and will stand out quite well amongst crisper played notes and add quite a bit of colour to the tune.
This is a good time as any to think about the sort of player you are likely to be. I think there are two main categories – the social player who seeks out the company of other musicians and enjoys public performance and pub sessions, or might you be a private person, happy with being a closet player, not having any great desire to show off in front of anybody. Either way, or a mixture of both, setting a good time loose on a critical ear, yours or others’, will make it all worthwhile, you will know what I mean when it happens.
If you want to play in sessions, then it obviously pays to learn those most commonly played or you will be playing on your own or not at all, depending on your confidence. You’ve probably got a good bit to be getting on with, for now anyway. In a while there could be another booklet about reels, hornpipes etc., but I hope that from here, you will be armed with the tools to discover for yourself. The object here was never more than give the confidence needed at the very beginning. A genesis booklet. Good luck.
A whistle tutorial And, of course, a range of flutes and whistles